

blender how to add texture
13 Blender tips from the pros

Blender may be free, but it isn't just a tool for hobbyists. The powerful open-source 3D package is now used on a variety of professional projects, from the Blender Foundation's own 'open movies' to illustrations, animated commercials and even visual effects work.
While the fundamentals of Blender are well covered by training materials available online, there is little information targeted specifically towards this new group of professional users.
To help you get the most from the software, we asked five of the world's 8leading Blender artists to provide their tips for working quicker and smarter under real-world production conditions.
01. Don't duplicate: instance instead
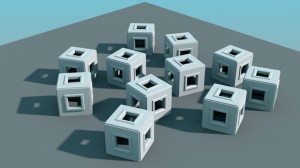
You can create and render vastly more complex scenes by using [Alt]+[D] instead of [Shift]+[D] to duplicate an object. The new object will share the same mesh data as the original, reducing memory usage. Even better, any changes made to one object will also be applied to the others, enabling you to update hundreds of objects at once. - Ian Hubert, 3D artist
02. Save time with flat projection
When you can get away with it, avoid UV mapping by using a quick-and-dirty flat projection on basic geometry. You can create complex, realistic objects in minutes. In most cases, the result will still look the same from a distance. - IH
03. Make use of Proportional Edit

Say you have a scene containing hundreds of individual objects: for example, rocks or plant geometry. To position each of them manually would take forever – so to speed up the process, use the Proportional Edit tool.
Select a single object and press [O] to turn on Proportional editing. Now press [G], [S] or [R] to respectively move, scale or rotate while simultaneously rolling the mouse wheel. You'll see that all of the objects in the Proportional editing region (shown by a white circle) are affected. The mouse wheel changes the size of the region.
Proportional Edit can be set to many different Falloff types (shown by a rollout near the blue circle Proportional Edit button). Selecting Random will cause random translation, rotation and scaling of objects within the soft-selection region – useful for 'messing up' a scene to make it feel more organic.
Since this trick works across all visible scene layers, put any objects that you don't want to affect into a separate layer, then simply turn that layer off. - James Neale, founding partner of Red Cartel
04. Use Pose Libraries for blocking
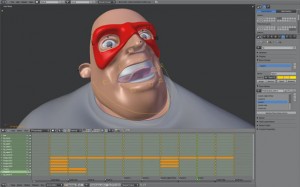
Pose Libraries are a great way to rough in animation, particularly for facial animation and lip sync. This is especially useful if your rig uses bones and drivers rather than exclusively relying on shape keys for phoneme shapes.
I like to make a bone group for my lip sync controls and use those controls to create my phonemes. Each phoneme gets saved as a pose in my character's Pose Library ([Shift]+[L]).
When animating, select the bones in the lip sync bone group and press [Ctrl]+[L] to enter a library preview mode. You can then use your mouse's scroll wheel or [Page Up]/[Page Down] to cycle through the poses in your library. Choose your pose and insert your keyframes. This works as your first rough pass on the lip sync to get the timing right.
On subsequent passes, you're free to adjust the facial controls to add more personality to your animation. And because a Pose Library is just a special kind of action, you can easily append it to any scene. - Jason van Gumster, owner of Hand Turkey Studios

Start by switching the render engine from Blender Render to Network Render. On your master node, choose Master from the Network Settings panel of Render Properties. When you click Start Service, you can view the status of the farm by opening a web browser on that machine and pointing it to http://localhost:8000. With the master node running, go to the other machines and set them up as slaves.
It's the same steps as for the master node: just choose Slave from Network Settings instead of Master. Assuming the machines are on the same network, when you click Start Service, the slave node should automatically find the master.
To render, go to the machine you want to render from and set up your client by switching to Network Render and choosing Client from Network Settings. If you click the refresh button, the client should automatically find the master node.
Now you can render your animation on your ad hoc farm by clicking the Animation on network button in the Job Settings panel. - JvG
06. Use Damped Track for eye tracking
Blender's Track To constraint is handy for making objects or bones point at a target. Unfortunately, it is also based on gimbal (or Euler) rotations, which can make it behave oddly.
Sometimes that behaviour is what you want (for turrets, for example) – but usually, it's not (on eyes, for example): what you would like is for the object to take the most direct rotation path from its starting rotation to point at the target. Fortunately, Blender has a constraint that does exactly that: it's called Damped Track.
In most cases, substituting Damped Track for Track To will give you the result you want. - NV
07. Use sculpting to fix errors in animation
One of the coolest uses for the sculpt tool was shown to me by animator and teacher Daniel Martinez Lara.
Instead of just sculpting static objects, you can use it to tweak the shape of characters as they move over time in order to polish animations. This enables you to fix deformations, add extra stretching or change the outline of a pose – things that are hard to do with bones, but easy to draw.
This only works in the very newest builds of Blender (2.56+). After animation is completed, go to Mesh Properties and locate the Shape Keys panel.
Select the Basic key selected from the list and click the plus icon to add a new shape key. Next, move the playhead to a frame you want to tweak, click the pin icon and enter sculpt mode.
For sculpting, I prefer to use the Grab tool for making larger shape changes, and then the Smooth tool to smooth out problem areas.
Once you are happy with your changes, exit sculpt mode and play with the shape Value slider. Hover your cursor over the slider and press the [I] key to insert keyframes to animate the effect in and out over time. - William Reynish, animator on Big Buck Bunny and Sintel
08. Feed Compositor nodes to the VSE via scene strips
When using Blender for motion graphics, there's some cool handshaking you can do between the Node Editor and Video Sequence Editor.
If a shot requires more involved effects than the VSE can provide, switch to the Compositing screen layout and create a new empty scene (I like to name the scene after the shot).
Use the Image input node to bring your clip into the Node Editor, adjusting the start and end frames in the node and the scene as necessary.
From this point, you can add whatever cool compositing effects you want. When you switch back to the Video Editing screen (it should still be in your editing scene), replace your shot by adding a scene strip in the VSE for your compositing scene.
As a bonus, if you delete all of the screen layouts except for Compositing and Video Editing, you can quickly bounce between your composite scene and your editing session using [Ctrl]+[left arrow] and [Ctrl]+[right arrow]. - JvG
09. Put colour into shadows and global illumination
By default in Blender, shadows and GI are black. This doesn't always give the best result. If you look at Pixar's work, for example, the shadow is usually a darker, more saturated version of the diffuse colour.
You can achieve this effect in the compositor by specifying your layer to output a separate GI and shadow pass. Use the Mix node set to multiply your shadow/GI with a colour of choice, them Mix that back into your render pass for best effect.
We sometimes render a scene (Scene01) with no GI or shadows at all, and an identical copy of that same scene (Scene02) to get just the GI and shadows layers by themselves. Use the compositor back in Scene01 to composite those layers from Scene02, using the colour picker inside the Mix node set to Multiply or Add to achieve the shadow colour we need. - JN
10. Use Only Insert Available when autokeying
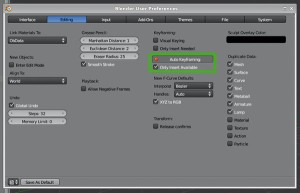
Blender, like many 3D applications, has a feature that will automatically insert keyframes when you move an object or bone. Blender calls this feature Auto Keyframing or 'autokey'. I prefer animating this way because it saves on keystrokes, and because otherwise I sometimes forget to key part of a pose I've been working on.
The drawback of using autokey is that it also sets keys on things you aren't intending to animate. For example, if I tweak the position of the camera or lights, and then tweak them again later on at a different frame, this will result in them being animated, even if I don't want it to be. Fortunately, Blender offers a way to solve this: Only Insert Available. With this option toggled on, autokey will only set keys on things that are already animated. The first time you key something, you have to do it manually, but from then on the process is automatic.
This lets you treat manual keying as way of telling Blender, "I want this to be animated." From then on, Blender takes care of the rest with autokey. - Nathan Vegdahl is a freelance 3D artist
11. Set up master files to grade large projects

Most large animation projects require you to keep track of many individual shots and grade them consistently at the end. You can use the Blender sequencer and compositor to do this.
First, start an empty .blend file. This will be your master file. Link in every scene you need from the individual .blend shot files and place them in order along the timeline of the sequencer in the master file. (This helps the editor, since the Blender sequencer produces an OpenGL version of each scene, making it easy to see the latest work from each scene in real time.)
You can now set the look and feel for each section of the animation. Select a group of shots that must have the same visual properties, and group those nodes together inside the master file, calling the group 'Master Comp' or something suitably witty. Go to each of the original individual shot files and link back to the Master
Comp group.
Now whenever any of the artists updates their work (for example, to update an asset, the animation, lighting, or scene-specific compositing) they only have to tell the person in charge of the master file to reload their particular scene, and the same global feel will be preserved.
Since the master file controls both the edit and the global composite group (the grade), rendering via that master file enables you to render the entire project with the exact edit decision list and composite gamut required. - JN
12. Set up Fake users to manage remote collaboration
Red Cartel often collaborates with artists working remotely outside the studio. To keep the pipeline as smooth as possible, we use Blender's excellent library systems. Data transfer for large scene files takes a long time, so for animators, we ask them to save out their Blender
scene with unique names for their character/camera actions.
If they then delete all the relevant working geometry and specify their most recent action as having a Fake user (the F button next to that action inside Dopesheet/Action Editor), that datablock is retained inside the empty .blend file.
This reduces the file size enormously, making it much quicker to transfer over the internet. Once uploaded, our local artists simply append or link that data into the latest render scene in order to get the remote artist's updated animation.
We use Dropbox (dropbox.com) heavily for this, and since the master edit/composite file refers to the Dropbox folder for each remote artist, all the latest animations are 'automagically' updated in the edit. - JN
13. Use Rigify for rapid rigging
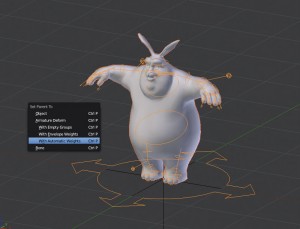
Rigify is an incredibly useful tool for getting characters rigged in a jiffy. Instead of spending days setting up a rig by hand, adding constraints, scripts and controllers, it makes the entire process a five-minute affair.
Rigify is actually a plug-in, but it's distributed with the latest releases of Blender. (I'm using version 2.56.) Before you can use it, you need to enable it by selecting File > User Preferences > Add-Ons and locating Rigify in the list. Click the check mark.
Next, add the 'meta-rig' (the default initial rig you will use to create your own custom set-up) via Add > Armature > Human (Meta-Rig). Position and scale this to match your character.
Enter Edit mode, and tweak the proportions further until all the bones line up with your mesh. Remember to use X-Axis Mirror in the Armature tools panel.
Go back to Object mode, and locate the Rigify Buttons panel in Armature Properties. Click Generate to create your final rig and discard the meta-rig. Parent your mesh to your generated rig and select With Automatic Weights in the popup.
The last (optional) step is to run a UI script to add a nice interface to the rig. Open the Blender Text Editor, and select rig_ui.py from the data list. Press Run Script in the header, and look in the info panel [N] in the 3D view. You'll have a nice list of context-sensitive controls for bones. - WR
The Creative Bloq team is made up of a group of design fans, and has changed and evolved since Creative Bloq began over a decade ago. The current website team consists of five people: Editor Kerrie Hughes (currently on maternity leave), Acting Editor Rosie Hilder, Deals Editor Beren Neale, Senior News Editor Daniel Piper, and Staff Writer Amelia Bamsey. The 3D World and ImagineFX magazine teams also pitch in, ensuring that content from 3D World and ImagineFX is represented on Creative Bloq.
Related articles
blender how to add texture
Source: https://www.creativebloq.com/13-blender-tips-pros-7113110
Posted by: farrararkmadesain.blogspot.com
0 Response to "blender how to add texture"
Post a Comment